After unexpacted host reboot, Powering on a RDM attached virtual machine fails with the error: Incompatible device backing specified for device '0'
Last week one of our host unexpectedly got restarted and
once the host came online we were unable to power on a VM (a passive cluster
node) due to an error like,
HA didn’t restart this VM due to a VM to host-Must DRS rule.

Now to fix this issue what we can do is, remove the affected RDM disk from the both nodes and then delete the RDM pointer file from Datastore (this doesn’t affect your actual data on LUN). Now after re-scanning the hosts for Datastores, re-add the LUN as RDM drive on both nodes. Now you would be able to power on the affected node.
#esxcli storage core device setconfig -d naa.id --perennially-reserved=false
Now the command to remove the device should work.
# esxcli storage core device detached remove -d naa.id
Incompatible device backing specified for device '0'
HA didn’t restart this VM due to a VM to host-Must DRS rule.
This error occurs when LUN is not consistently mapped on
hosts where primary/secondary hosts are running however here when crosschecked
found everything correct (LUN Number/naa.id) on affected host.
As this was a passive node so we removed the affected drive
from this VM and started this node and then started investigating the issue.
On checking the vml.id of this LUN on both hosts, found it
different but the strange thing was its correct on the host in question but
wrong on all other hosts in cluster. To share a LUN with different nodes, it
should be consistently mapped on all hosts and should have consistent unique
vml.id (VMware Legacy id) but here its different so seems the RDM disk pointer file meta data got
corrupted.
You can find the vml.id of LUN as follows,
First note down/copy the identifier of LUN (naa.id) and then fire this cmd,
First note down/copy the identifier of LUN (naa.id) and then fire this cmd,
#esxcli storage core device list -d naa.id

Now to fix this issue what we can do is, remove the affected RDM disk from the both nodes and then delete the RDM pointer file from Datastore (this doesn’t affect your actual data on LUN). Now after re-scanning the hosts for Datastores, re-add the LUN as RDM drive on both nodes. Now you would be able to power on the affected node.
If due to any reason above doesn’t work then as above after
removing the affected RDM drives from both nodes, follow these steps,
- Note the NAA_ID of the LUN.
- Detach RDM using vSphere client.
- Un-present the LUN from host on storage array.
- Rescan host storage.
- Remove LUN from detached list
using these commands:
#esxcli storage core device detached list
#esxcli storage core device detached remove -d naa.id - Rescan the host storage.
- Re-present LUN to host.
- Now again rescan the hosts for datastores
If the LUN has
been flagged as perennially reserved, this can prevent the removal from
succeeding.
Run this command to remove the flag:
Run this command to remove the flag:
#esxcli storage core device setconfig -d naa.id --perennially-reserved=false
Now the command to remove the device should work.
# esxcli storage core device detached remove -d naa.id
Now cross check the vml.id on hosts and it should be same
and after adding the RDM drive on nodes you will be able to power on the VM
nodes.
Reference: VMware KB# 1016210
That’s it… :)
Thursday, Jul 21, 2016
How to deal with unresponsive windows service, like vCenter svc
You might have seen this, where you tried to restart a
windows service and it got stuck on stopping or in some cases starting.
Recently same thing happened with me when tried to restart vCenter service, it got stuck on stopping service.
 Here for vCenter service its ‘vpxd’
Here what we can do is, first note down the service name by
going to its properties,

Now open windows command prompt in elevated mode and run
this cmd,
C:\> sc queryex vpxd
This will give show you the detailed info/status of intended service, note down the PID of respective service.
This will give show you the detailed info/status of intended service, note down the PID of respective service.
SERVICE_NAME: vpxd
TYPE : 10 WIN32_OWN_PROCESS
STATE : 3 STOP_PENDING
(STOPPABLE, NOT_PAUSABLE, ACCEPTS_SHUTDOWN)
WIN32_EXIT_CODE : 0 (0x0)
SERVICE_EXIT_CODE : 0 (0x0)
CHECKPOINT : 0x0
WAIT_HINT : 0x493e0
PID : 4061
FLAGS :
TYPE : 10 WIN32_OWN_PROCESS
STATE : 3 STOP_PENDING
(STOPPABLE, NOT_PAUSABLE, ACCEPTS_SHUTDOWN)
WIN32_EXIT_CODE : 0 (0x0)
SERVICE_EXIT_CODE : 0 (0x0)
CHECKPOINT : 0x0
WAIT_HINT : 0x493e0
PID : 4061
FLAGS :
Now run this cmd,
C:/> taskkill /f /pid xxxx
Here the PID is 4061 so,
C:/> taskkill /f /pid 4061
this will terminate the service immediately, once done then
you can start the service either from GUI (services console) or from cmd itself
by running this command,
C:/> sc start vpxd
That’s it... :)
ESXi 5.x host not accessible/showing as inaccessible after reboot
You might have seen this issue where you rebooted an host and even after
waiting for a long time it didn't come up and showing as inaccessible
in vCenter inventory. Tried to reconnect the host but end up with this
error,
"Cannot contact the specified host (ESXi1.mylab.com). The host may not be available on the network, a network configurati-on problem may exist, or the manageme-nt services on this host may not be responding."
Then I tried to ping this host but no luck, however when connected to host using physical server remote management tool, found the host up.
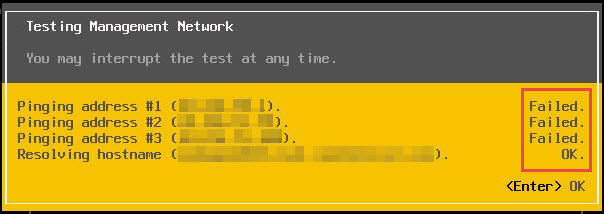
This is something that I had seen earlier, in this case what you need to check is, login to DCUI from server remote management console (hp iLO or Dell iDRAC or IBM IMM or whatever) and then check IP configuration of the host as well as test the management network.

Most of the time when you test the management network, you would see something like, host is not reaching to gateway/DNS or sometimes strangely DNS is not reachable but name resolution is happening.

In this case most of the time, fix of this issue as simple as restarting the management network.

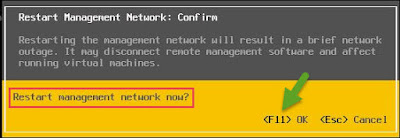
Sometimes you may need to restart the management network more than once.
As soon as management network restart, host would be accessible (start pinging) again however sometimes you may also need to restart host management agents to make it available/accessible from vCenter console.
That's it... :)
"Cannot contact the specified host (ESXi1.mylab.com). The host may not be available on the network, a network configurati-on problem may exist, or the manageme-nt services on this host may not be responding."
Then I tried to ping this host but no luck, however when connected to host using physical server remote management tool, found the host up.
This is something that I had seen earlier, in this case what you need to check is, login to DCUI from server remote management console (hp iLO or Dell iDRAC or IBM IMM or whatever) and then check IP configuration of the host as well as test the management network.

Most of the time when you test the management network, you would see something like, host is not reaching to gateway/DNS or sometimes strangely DNS is not reachable but name resolution is happening.
In this case most of the time, fix of this issue as simple as restarting the management network.


Sometimes you may need to restart the management network more than once.
As soon as management network restart, host would be accessible (start pinging) again however sometimes you may also need to restart host management agents to make it available/accessible from vCenter console.
That's it... :)
Thursday, jul 21, 2016
VM has network connectivity but network card showing as disconnected, having red cross on it
In this post I will talk about this minor issue where,
System has network connectivity but network card showing as disconnected,
having red cross on it.
 Earlier I had seen this problem and drafted a blog post about it but
never posted until recently when one of my friend faced the same issue
but
couldn’t find its cause/fix.
Earlier I had seen this problem and drafted a blog post about it but
never posted until recently when one of my friend faced the same issue
but
couldn’t find its cause/fix.
 Here to fix this, you just
need to check the status of “Network
Location Awareness service”, in this case either its stopped or set to
disabled. This service should be set to automatic and in started state.
Here to fix this, you just
need to check the status of “Network
Location Awareness service”, in this case either its stopped or set to
disabled. This service should be set to automatic and in started state.
As this issue was caused by a windows services so I don't think its specific to VM only, you might see this issue on a physical Windows system as well.
Note: “Network Location Awareness service” is responsible to collect and stores configuration information for the network and notifies programs when this information is modified. If this service is stopped, configuration information might be unavailable. If this service is disabled, any services that explicitly depend on it will fail to start.
That’s it… :)
Now coming to the point, you might have seen this where you
deployed a VM from template or rebooted a system and when the VM came up, you
are able to connect to it but its network card in notification area having red cross on it (appearing disconnected).
If you would check from connectivity point of view, you
wouldn’t find anything wrong here however most of the time you would like to
get rid of this red cross sign.
If you would further
investigate about the issue, then you will find this in Network and Sharing
Center,

As this issue was caused by a windows services so I don't think its specific to VM only, you might see this issue on a physical Windows system as well.
Note: “Network Location Awareness service” is responsible to collect and stores configuration information for the network and notifies programs when this information is modified. If this service is stopped, configuration information might be unavailable. If this service is disabled, any services that explicitly depend on it will fail to start.
Unexpected AD Account Lockouts When Logging On to Outlook
Today one of my friend asked me a AD account lockout related
question, i.e. "there are two users and when they open outlook on their
system, their AD accounts getting locked out automatically".
In such kind of cases, most of the time the issue is caused
by a saved password, where user recently changed his account password but
somehow outlook is not asking for new password and trying to connect using the
old saved credentials instead.
To fix this account lockout issue, what one need to do
is....remove the saved credentials from the system where your outlook account
is configured.
To do so, Go to Start=> Control Panel => Credential
Manager

or open, Run => control keymgr.dll , this will also open the Credential Manager

Here Edit or Remove the saved outlook credentials and this will fix the AD account lockout issue.
Alternatively we can do the same by using this method,
Click Start, Run => rundll32.exe keymgr.dll, KRShowKeyMgr (case sensitive)
Alternatively we can do the same by using this method,
Click Start, Run => rundll32.exe keymgr.dll, KRShowKeyMgr (case sensitive)


credentials.
Update: As per my discussion with a fellow Sys admin, Removing the credentials from Credentials Manager doesn't necessarily remove them from Key manager so sometimes we also need to check and remove the same from Stored User Names and Passwords. I am not sure if it's true as never seen this behaviour.
That's it... :)
Thursday,jul 21, 2016
Windows 7 VM auto suspend issue- reason and fix
Last day one of my colleague built a new VM with Windows 7 guest OS and
after some time he noticed, once he logged off from this VM, its being
automatically suspended after some time.
As he couldn't figure out the issue so asked me to take a look at this newly created VM to figure out why its being suspended automatically every now and then. When I checked, found the VM in suspended state, when taken a look at related task & events from vSphere client, couldn’t find anything in tasks however found suspend events under event tab.
As he couldn't figure out the issue so asked me to take a look at this newly created VM to figure out why its being suspended automatically every now and then. When I checked, found the VM in suspended state, when taken a look at related task & events from vSphere client, couldn’t find anything in tasks however found suspend events under event tab.


Here it clearly mentioned, system was entered in sleep mode
because it was ideal…..so what’s now…. Here we need to check from inside the
guest, if the power plan for the Windows 7 is set to move the system to sleep
if system is ideal for a specified time.
Now go to power options, Control Panel => Power Options
=> Click on Change when the computer sleeps


as you can see here, this VM was set to enter in sleep mode if the system
is ideal for 15 minutes.
Now what we need to do is,
set "Put the computer to sleep" to "Never" and you
are done.

Note: I believe the same will be applicable for Windows 8 or any other client OS VM too.
This power plan setting is something that's by default set to
never on server operating systems and that is why we never faced such issue with Server VMs.
That's it... :)
That's it... :)
Wednesday, March 2, 2016
Uploading ESXi image to vSphere Update Manager failing with the error: Failed to import data
When it comes to ESXi host patching, I am a big fan of VMware Update
Manager as it makes the upgrade process flawless. Using VUM, you just
need to create upgrade baseline, download patches then attach baseline
to host and finally stage/remediate the patches then update manger will
initiate the patch installation and reboot the host once done.
Now coming to the point, we had few ESXi 5.0 hosts and wanted to upgrade
them to ESXi5.1 update3 so I thought of upgrading them using VUM
instead of command line.
As most of us know, to upgrade ESXi on an host using VUM, one first need
to download ESXi iso image and import it to VUM ESXi image repository,
here while trying to import the ESXi5.1 image to update manager5.5’s
ESXi image repository, ESXi image import failed with below error,
"Failed to import data, The uploaded upgrade package cannot be used with VMware vSphere Update Manager"
 I was aware about the fact that one need to upgrade the version of VUM
before importing a newer image to update manager repository as the
minimum version of VUM required should match the version of the ESXi
image you are trying to import but here I was trying to upload ESXi5.1
image to VMware Upgrade Manager 5.5 and unable to do so. I tried with
different ESXi5.1 images like Cisco or HP’s customized images as well as
standard VMware ESXi5.1 image but the end result was same however when
tried to import ESXi5.5 image to VUM, was able import it without any
issue.
I was aware about the fact that one need to upgrade the version of VUM
before importing a newer image to update manager repository as the
minimum version of VUM required should match the version of the ESXi
image you are trying to import but here I was trying to upload ESXi5.1
image to VMware Upgrade Manager 5.5 and unable to do so. I tried with
different ESXi5.1 images like Cisco or HP’s customized images as well as
standard VMware ESXi5.1 image but the end result was same however when
tried to import ESXi5.5 image to VUM, was able import it without any
issue.
"Failed to import data, The uploaded upgrade package cannot be used with VMware vSphere Update Manager"

This is something that was very strange for me so
started looking for the cause of this issue and my search end on the
VMware KB articles# 2009812, if you would see the Note section of this KB, its clearly mentioned there,
“ You must use the same version of vSphere Update Manager to upgrade to the corresponding version of ESXi”
Later I checked with VMware support about this and they also confirmed the same.
Related KB article: 2097168
That’s it… :)
Saturday, January 30, 2016
vCenter Server shows ESXi host as not responding


As no other host was having this issue except two- three remote hosts that means the issue is not related to vCenter server firewall/port blocking.
On checking vpxd logs I found few missed heartbeats entries
as well as this kind of entries for affected host ,
As vpxd log clearly shows, this issue is related to vCenter
to host connectivity and that could be due to congested network. Here what we
can do as a work around to avoid this issue is, we can increase the host to
vCenter heartbeat response timeout limit from 60 seconds to 120 seconds
(by default Esxi host sends a heartbeat to vCenter in every 10 seconds and
vCenter has time window of 60 seconds to receive it). Please remember
Increasing the timeout is a short-term solution until the network issues
can be resolved.
To do so, Using
vSphere Client:
Connect to vCenter, Administration => vCenter
Server Settings => select Advanced
Settings
Now in the Key field, type:
config.vpxd.heartbeat.notRespondingTimeout
In the Value field, type: 120

Restart the VMware vCenter Server service for changes to take effect.
Using
vSphere Web Client:
Connect to vCenter Server using vSphere Web client and navigate to the vCenter Server instance
Select the Manage tab,

Now in the Key field, type: config.vpxd.heartbeat.notRespondingTimeout
In the Value field, type: 120
Click Add, OK
Restart the VMware vCenter Server service for changes to take effect.
Reference: Related KB#1005757
That’s It… :)
Thursday, January 21, 2016
Newly presented LUNs are not visible on Esxi host
Today when I was migrating two MSCS cluster VMs from one
host to another (cold migration), found 5 LUNs missing on target host so asked the Storage
admin to present these LUNs on target host. Once the Storage admin confirmed
the same, we re-scanned the Storage/HBA adapters for datastore/LUNS, after the
rescan when checked for the newly added LUNs, was surprised to see on one host
only two LUNs were visible while on another host all five LUNs were visible. Then I checked with
storage team, they confirmed that everything is fine from their end and I might need
to restart the host to make the LUNs visible.


 As most of us would be aware, the VMware vSphere Host
storage path limit as of vSphere 5.x is 1024 and the maximum LUNs per host is
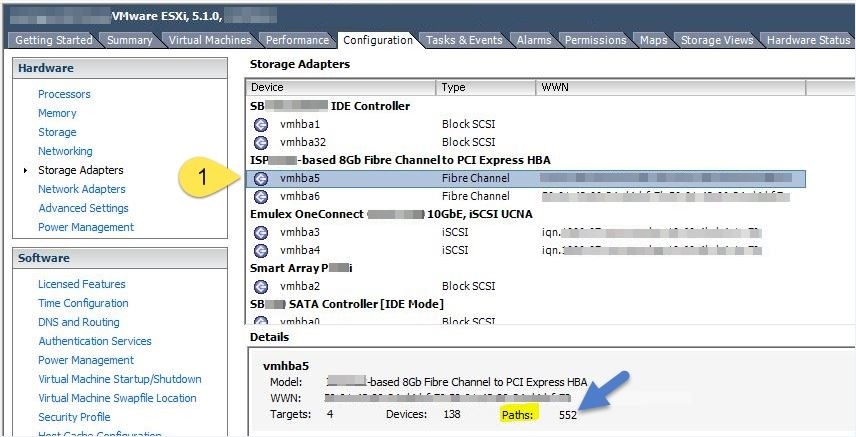
256 (refer to configuration maximums) and as this host was already having the max supported paths
(552+471+1= 1024), thus was unable to add new LUNs/Paths.
As most of us would be aware, the VMware vSphere Host
storage path limit as of vSphere 5.x is 1024 and the maximum LUNs per host is
256 (refer to configuration maximums) and as this host was already having the max supported paths
(552+471+1= 1024), thus was unable to add new LUNs/Paths.
Reference: David Ring's blog post on host path limit, VMware KB#1020654.
After evacuating all the VMs, rebooted the host but even
after reboot LUNs were unavailable. Later when I further investigated, the
issue turned out to be related to max storage path, yes this host was already
having the max storage paths that is why newly mapped LUNs were not visible.
Note: Local storage, including CD-ROMs, are counted in your
total paths.
You can see how many paths are being used on a specific host
by Selecting the host, going to Configuration => Storage Adapters =>
Storage Adapter


Fix: To fix this issue, ask the storage team to reduce the
number of paths per LUN so that there are fewer than the 1024 total limit, or
reduce the number of LUNs presented to the host.
Note: put the host in maintenance mode during the storage
path correction and once done, re-scan the host/storage adapters for
datastore/LUNs.
Reference: David Ring's blog post on host path limit, VMware KB#1020654.
That’s it... :)
Monday, January 18, 2016
VM not accessible/lost network connectivity after reboot
This past week as part some activity
we powered off some Virtual Machines and after some time when powered
on those VMs again, I was surprised when the network would not come up
for two VMs. I tried to ping them but VMs were not reachable so I
logged-in on one of the virtual machine via VM console to check the IP
configuration etc and found Network Card was showing limited
connectivity (yellow sign on NIC icon) however the IP information was
correct, then tried to ping from inside the VM without success. I also
the rebooted the VMs again but that didn’t fix the connectivity issue.
I did remember few months back we had faced a similar issue however at that time default gateway was not turned on and ipconfig was showing an APIPA address like 169.254.x.x. To fix that issue we had to reconnect the VM network card so tried the same here too and it worked.
To fix the issue what you need to do is, Select the affected VM and go to Edit VM settings => select the vNIC adaptor =>Deselect Connected => Now click OK to apply the setting

Now Navigate again to the Edit VM Settings => select the vNIC adaptor =>Select Connected => And click OK to apply the setting.
 Once settings applied, VM came back to network again.
On another VM just to test if a cold reboot would work here, I powered off the VM and once it powered off, powered it on again and voila VM was accessible again.
Thus we can fix this issue either by a cold reboot or by reconnecting the virtual network card.
Update: Today I came across the same issue again, this time it was a MS Server 2012 R2 OS VM and a cold reboot didn't fix the issue, one more thing sometime in order to fix the issue, you may need to repeat the vNIC disconnect process.
Update2_25/02/2016: Sometime the above wouldn't work at all, then what you can do is: login to the affected server via VM console => Go to Network card properties and disable, re-enable the network card from inside the OS and hopefully server would come back to network again.
The other thing you can do is Change the IP assignment setting from Static to Dynamic, it would pick an IP from APIPA, then change it back to Static and it should work now.
Note: For further detail about the issue, you may refer to the related VMware KB#2012646.
That’s it... :)
I did remember few months back we had faced a similar issue however at that time default gateway was not turned on and ipconfig was showing an APIPA address like 169.254.x.x. To fix that issue we had to reconnect the VM network card so tried the same here too and it worked.
To fix the issue what you need to do is, Select the affected VM and go to Edit VM settings => select the vNIC adaptor =>Deselect Connected => Now click OK to apply the setting

Now Navigate again to the Edit VM Settings => select the vNIC adaptor =>Select Connected => And click OK to apply the setting.

On another VM just to test if a cold reboot would work here, I powered off the VM and once it powered off, powered it on again and voila VM was accessible again.
Thus we can fix this issue
Update: Today I came across the same issue again, this time it was a MS Server 2012 R2 OS VM and a cold reboot didn't fix the issue, one more thing sometime in order to fix the issue, you may need to repeat the vNIC disconnect process.
Update2_25/02/2016: Sometime the above wouldn't work at all, then what you can do is: login to the affected server via VM console => Go to Network card properties and disable, re-enable the network card from inside the OS and hopefully server would come back to network again.
The other thing you can do is Change the IP assignment setting from Static to Dynamic, it would pick an IP from APIPA, then change it back to Static and it should work now.
Note: For further detail about the issue, you may refer to the related VMware KB#2012646.
That’s it... :)
Saturday, January 16, 2016
ESXi host stuck "in progress" when exiting maintenance mode
This was first time when I came across such issue where exit from
maintenance mode was taking a long time and appearing like stuck on 15%
(waited for at least 20 minutes). To see whats going on the host,
connected to the host using
Putty and checked the maintenance status of host using the vim-cmd
command,
#vim-cmd hostsvc/hostsummary |grep inMaintenceMode
 Then I thought vSphere client might not refreshed the task
status so closed the connection and then reconnected to vC again. This time
there was some progress, but still it was taking too long to Exit from maintenance
mode.
Then I thought vSphere client might not refreshed the task
status so closed the connection and then reconnected to vC again. This time
there was some progress, but still it was taking too long to Exit from maintenance
mode.
#/etc/init.d/hostd restart
#/etc/init.d/vpxa restart
#vim-cmd hostsvc/hostsummary |grep inMaintenceMode
And I was amazed to see the output, it was
clearly showing the host has exited from maintenance mode while from GUI it was still showing in progress.

Whenever we see this kind of unusual issues , we look at restart of host management agents.
I have bad experience in past with restarting all the
agents at once using #services.sh restart (it takes a long time to complete),
so prefer to restart host and vCenter agents individually using below
commands,
#/etc/init.d/hostd restart
#/etc/init.d/vpxa restart
Now coming back to the point, this fixed the issue however
the host was showing like the HA agent didn’t installed correctly so
again I put the host back in to the maintenance mode and once the task
completed,
exited from maintenance and this time there was no issue.
That’s it… :)
Wednesday, January 6, 2016
VM not accessible, you might also need to check datastore for space
Last weekend I got a support call from database team to
check, why they lost connectivity to a database server VM. Firstly I tried to
ping this VM but it was not reachable so
have to login to vCenter to see what’s wrong with that VM. First thing that I noted,
VM was powered on but had a message sign on it and when tried to open VM
console for further investigation, got a datastore space related popup
question,
 Clicked on retry but the pop-up came up again.

When I checked the datastores where the VM disks reside, I was amazed to see this,

 Select Retry option in VM question and click ok.

As this popup question suggests, there was not enough space
in datastore for the VM to breath and this is because the VM was running on
Snapshot (******-000001.vmdk).
Even you would see the same question in VM
summary page.

When I checked the datastores where the VM disks reside, I was amazed to see this,
Here one may ask why this happened, do you not having
Storage Cluster/SDRS and the answer is no we don’t (that’s a different story).
Thin provisioning is also not the case here but the Snapshot of this large VM
is (this VM having one or more TB disk attached). This snapshot was created by
VM backup tool during backup but at
the same time there was some activity going on the server so it grows
unexpectedly, eaten all available datastore space and cause this issue.
(if you are thinking why the hell we are taking image level
backup of database VM drives, please don’t bother to ask me as I also couldn’t
find the logic of that)
So to fix this what we need to do is, check all the
datastores where VM disks reside (in VM summary you would see the datastore in
question with space error/warning alert), create space for VM to breath and
once you are done, go to VM summary,

VM should be accessible now (now you might also take a look at backup
server to see if backup was completed, if so but the snapshot is still
there then delete the snapshot and if the backup job is still in running
state then no worries snapshot would automatically delete once the
backup complete).
Note: You may also see an open VM console MKS error during
open VM console (like /vmx file not accessible or unable to open) due to space
crunch in datastore.
That's it... :)
Thursday,Jul 21, 2016
How to add RDM to Microsoft Cluster nodes without downtime
This is something that we do once in
months so you might forget the process and then come across errors few
time before recalling the right process at least this have happened with
me more than twice so thought of making a note of the process of adding
RDMs to already up and running MSCS cluster nodes.
Adding RDM to Microsoft Cluster nodes is little different from adding RDM LUN to an independent Virtual Machine.
The first part is same in both cases, you can add RDM disk while VM is powered on however in case of MSCS node one need to power off the VM before initiating the same on secondary node.
Open VM Settings => Click on Add Hardware, Select Hard disk => select Disk type as RAW device mapping =>now this the screen you can select the intended LUN,
 On next screen Select, where you want to store the RDM pointer files,
Next => on this screen you would select the RDM compatibility, it
could be Physical or Virtual (description of both is available in
screenshot), Select Physical
On next screen Select, where you want to store the RDM pointer files,
Next => on this screen you would select the RDM compatibility, it
could be Physical or Virtual (description of both is available in
screenshot), Select Physical
 On next screen you would select controller => then you would see summary here, click finish and you are done.
Again go to the fist node's VM settings and select the newly added RDM drive and copy/right down the path of RDM Pointer file, do the same for any other RDM...
Now power off the node if its not already powered off(if this was the primary node, cluster resources would automatically move to another available node or move the resources to secondary node manually and power off the VM).
If you wouldn't power off the first node and try to add the rdm to secondary VM, you will get following error,
 And if you power off the secondary node then you would able to add the
RDMs to it however when you would try to power it on, you will end up
with this error,
And if you power off the secondary node then you would able to add the
RDMs to it however when you would try to power it on, you will end up
with this error,
 So if you are not already aware you would wonder, what;s the right way to do that. Here it is:
Power off the node where you have already added the RDM LUNs(if not already) and Now Add the RDMs to the Secondary Node while its a active cluster host and online.
Open VM Settings => Click on Add Hardware, Select Hard disk => now this the screen you need to select add an existing disk


On next screen you would select controller => then you would see summary , click finish and you are done.
That's it... :)
Adding RDM to Microsoft Cluster nodes is little different from adding RDM LUN to an independent Virtual Machine.
The first part is same in both cases, you can add RDM disk while VM is powered on however in case of MSCS node one need to power off the VM before initiating the same on secondary node.
Open VM Settings => Click on Add Hardware, Select Hard disk => select Disk type as RAW device mapping =>now this the screen you can select the intended LUN,


Again go to the fist node's VM settings and select the newly added RDM drive and copy/right down the path of RDM Pointer file, do the same for any other RDM...
Now power off the node if its not already powered off(if this was the primary node, cluster resources would automatically move to another available node or move the resources to secondary node manually and power off the VM).
If you wouldn't power off the first node and try to add the rdm to secondary VM, you will get following error,


Power off the node where you have already added the RDM LUNs(if not already) and Now Add the RDMs to the Secondary Node while its a active cluster host and online.
Open VM Settings => Click on Add Hardware, Select Hard disk => now this the screen you need to select add an existing disk

On Next screen you need to provide/browse the path earlier noted/copied RDM Pointer file,

On next screen you would select controller => then you would see summary , click finish and you are done.
That's it... :)
Thursday,jul 21,2016
Snapshot Disk Consolidation fails with a file lock error message
This is common in an environment where you are using VM backup solutions
like vRanger, Veem backup, Avamar etc which takes backup at Esxi's
level and uses hot-add technology to take back up of a VM.
Cause: During the backup of the VM a snapshot was made, then the base disk of target VM was hot-added to the VM that handles the backup (vRanger/Veem or any other backup solution uses hot add technology). Now the backup was made. After the backup however the backup solution somehow did not manage to hot-remove the disks from the backup software VM. This meant the base disks of the VM being backed up were still locked, hence the failure when trying to consolidate.
In VM summary you would see this,
 And when you try to consolidate the snapshot disks, you would get this error,

One can fix this issue by using one of these methods:
1. Go to the settings of your backup software Virtual Machine's settings and check for the attached disk, you would find some extra disks there (affected VMs disks), now you need to unlink your vmdk files from his virtual machine (Do Not Delete the Disks, Only remove them from this Virtual Machine).
Once disks are unlinked from the backup software VM then you need to run Snapshot consolidation on affected and this time it will consolidate all snapshots to base disk and complete without any issue.
2. In this method Storage vMotion the affected VM to another datastore (Right click on VM => Migrate => now you need choose migrate disks to another available datastore – this will clear lock on disk files of the virtual machine.
Now run the Snapshot consolidation and it will complete without any issue.
Note: However the Snapshot consolidation completed successfully but you may still need to remove the base disk from Backup Software Virtual Machine(Do Not Delete the Disks, Only remove them from this Virtual Machine).
Related Issue: VM backup failed with an error like, "one or more disks from virtual machine ******* is alreadymounted to the backup software VM. You must unmount these disks before attempting to bakup the virtual machine".

The fix of this issue lies in the first part of above solution.
That's it... :)
Cause: During the backup of the VM a snapshot was made, then the base disk of target VM was hot-added to the VM that handles the backup (vRanger/Veem or any other backup solution uses hot add technology). Now the backup was made. After the backup however the backup solution somehow did not manage to hot-remove the disks from the backup software VM. This meant the base disks of the VM being backed up were still locked, hence the failure when trying to consolidate.
In VM summary you would see this,


One can fix this issue by using one of these methods:
1. Go to the settings of your backup software Virtual Machine's settings and check for the attached disk, you would find some extra disks there (affected VMs disks), now you need to unlink your vmdk files from his virtual machine (Do Not Delete the Disks, Only remove them from this Virtual Machine).
Once disks are unlinked from the backup software VM then you need to run Snapshot consolidation on affected and this time it will consolidate all snapshots to base disk and complete without any issue.
2. In this method Storage vMotion the affected VM to another datastore (Right click on VM => Migrate => now you need choose migrate disks to another available datastore – this will clear lock on disk files of the virtual machine.
Now run the Snapshot consolidation and it will complete without any issue.
Note: However the Snapshot consolidation completed successfully but you may still need to remove the base disk from Backup Software Virtual Machine(Do Not Delete the Disks, Only remove them from this Virtual Machine).
Related Issue: VM backup failed with an error like, "one or more disks from virtual machine ******* is alreadymounted to the backup software VM. You must unmount these disks before attempting to bakup the virtual machine".
The fix of this issue lies in the first part of above solution.
That's it... :)
Thursday, jul 21, 2016
vSphere Web client and latest version of Chrome, IE11
Last week one of my friend pinged me to take a look at vSphere Web client
as he was not able to open virtual machine console, this option was
greyed out,
 My
first question was to him, have he installed wcb client client
integration plugin before trying to open VM console using Chrome Browser
and he said yes. On checking I found pop-up blocker was enabled but
even after disabling, VM console option was still greyed out.
My
first question was to him, have he installed wcb client client
integration plugin before trying to open VM console using Chrome Browser
and he said yes. On checking I found pop-up blocker was enabled but
even after disabling, VM console option was still greyed out.
We re-installed client integration plugin, restarted browser but nothing worked.
Then I suggested it seems a browser issue lets try with ie, he had ie 11 installed when he logged in using IE11 browser, we were amazed to see we had all vm folders but no VM was available when clicking on VM folder.
 Its then when I started looking about this issue.
Lets start with Chrome:- After some digging we found VMware kb# 2114800, As per this kb, after updating Google Chrome to Version 42 or later, vSphere Web Client Integration Plugin 5.x no longer functions.
This issue occurs because the Netscape Plug-in API (NPAPI) is deprecated(no longer available) in Google Chrome 42 and later. The NPAPI is deprecated by all modern browsers.
Resolution:- This is a known issue affecting VMware vSphere Web Client 5.x, this issue is resolved in vCenter Server 5.5 Update 3a.
We re-installed client integration plugin, restarted browser but nothing worked.
Then I suggested it seems a browser issue lets try with ie, he had ie 11 installed when he logged in using IE11 browser, we were amazed to see we had all vm folders but no VM was available when clicking on VM folder.
Lets start with Chrome:- After some digging we found VMware kb# 2114800, As per this kb, after updating Google Chrome to Version 42 or later, vSphere Web Client Integration Plugin 5.x no longer functions.
This issue occurs because the Netscape Plug-in API (NPAPI) is deprecated(no longer available) in Google Chrome 42 and later. The NPAPI is deprecated by all modern browsers.
Resolution:- This is a known issue affecting VMware vSphere Web Client 5.x, this issue is resolved in vCenter Server 5.5 Update 3a.
Currently, there is no resolution for 5.0 and 5.1.


To work around this issue:
- Enabling the NPAPI feature within Google Chrome 42 through 44.
Note: These steps are not applicable to Google Chrome 45 and later.
To enable NPAPI in Google Chrome:
- Open a new browser tab in Google Chrome
- In the address bar, enter this:
chrome://flags/#enable-npapi - Under the Enable NPAPI section, click Enable.
- Refresh or launch the vSphere Web Client landing page and attempt to use the CIP features.
- Use Mozilla Firefox version 39.x or later in to access the CIP-integrated features of the vSphere Web Client.
- Use the vSphere Client.
Note: For virtual machine control due to the deprecation of NPAPI, the VMware Remote Console (VMRC) is released to take its place.
IE11:- I was not able to reproduce the issue for ie11 in my homelab as he had vSphere web client version 5.5.0 build 2414847 and I have a different build.
Microsoft Internet Explorer 11 is Supported in vSphere 5.5 Update 1 and later versions, for later versions,
Fixing the client integration issue for ie11 is quite simple, After logging to the vSphere web client, hit the Alt key within your IE11 session and select “Tools” followed by “Compatibility view settings”, and add the vSphere url to the approved compatibility view list. Then click OK and its all set.


Now vSphere web client integration for ie should work.

Note: For
virtual machine control due to the deprecation of NPAPI, the VMware
Remote Console (VMRC) is released to take its place. To open with VM
remote console, go to VM Summary

It would work for any browser.
That's it... :)
Thursday, jul 21, 2016
Server has a weak ephemeral Diffie-Hellman public key error in Chrome/Firefox

Note:- This is a known issue affected the vSphere Web Client 5.1, it is resolved in vSphere Web Client 5.1 Update 3e and later
This issue occurs due to changes to the web browser containing a fix to combat an unrelated vulnerability that consequently disables certain SSL Ciphers.
When I was looking for how to avoid this for web client or any other site giving this error, I came across the thread about the related issue on Google Chrome Help Forum and the summary is, so far Chrome itself doesn't have any option to disable related setting to allow the sites having relatively week security.
If a secure website gets the error ERR_SSL_WEAK_SERVER_
This is the problem in the Logjam vulnerability, which affects both browsers and servers: https://weakdh.org
In this case,
the website/webserver needs to be fixed. Google Chrome won't use
insecure connections in order to protect your privacy.
In my case I am using self signed certificate instead of certificate authority signed certificate.
To
use this extension, first go to Chrome Web Store and add IE Tab
extension to chrome, now go to your url, you will again get the "Server has a weak ephemeral Diffie-Hellman public key error" Now
all you have to do is click on the IE Tab icon which you will find in
the right corner of the Chrome window (Highlighted in Blue),

And once you would click on IE Tab icon,

Though it's not an official fix, it still works and would allow you view the web pages without any issues.
about:config
Here in this config page, you will find a list of boolean entries. Search for below two entries,
security.ssl3.dhe_rsa_aes_128_sha

security.ssl3.dhe_rsa_aes_256_sha
By default, these are set to TRUE. But you have to set them to FALSE in order to allow the less secured pages.
Reference: kb# 2125607,
Reference: kb# 2125607,
That's it... :)
No comments:
Post a Comment